Introduction
Welcome to this image segmentation tutorial, where we’ll explore the fascinating world of object extraction using image segmentation techniques. In this comprehensive guide, we’ll be using two powerful and cutting-edge tools: Detectron2 and Mask2Former. These state-of-the-art libraries have transformed the way we approach image segmentation tasks, making them more accessible and efficient than ever before.
Image segmentation plays a crucial role in computer vision applications, as it allows us to group pixels with different semantics, such as category or instance membership. This process forms the backbone of various tasks, including object extraction, which we’ll be focusing on in this tutorial.
Throughout this article, we’ll demonstrate how to use Detectron2 and Mask2Former to extract segmented instances of objects from an image and generate a PNG image with the extracted object on a transparent background. This technique has numerous practical applications, ranging from image editing and manipulation to augmented reality and computer vision-based systems.
By the end of this tutorial, you’ll have gained a solid understanding of object extraction using image segmentation, and you’ll be equipped with the knowledge to implement these powerful techniques using Detectron2 and Mask2Former. Whether you’re a seasoned computer vision expert or a curious beginner looking to expand your skillset, this guide is tailored to suit a wide range of audiences.
So, let’s embark on this exciting journey together and unlock the full potential of object extraction using image segmentation with Detectron2 and Mask2Former!

Detectron2

Detectron2 is an open-source computer vision library developed by Meta AI Research (formerly FAIR – Facebook AI Research) that provides an implementation of state-of-the-art object detection, segmentation, and pose estimation algorithms. It is the second version of the original Detectron library and is built on top of the PyTorch deep learning framework.
Detectron2 includes implementations of popular models such as Mask R-CNN, RetinaNet, and DensePose, among others. It is designed to be flexible, extensible, and easy to use for research purposes, making it a popular choice for researchers and developers working on computer vision tasks.
Key features of Detectron2 include:
- Modular design: The library is designed to be easily extensible, allowing users to plug in custom components and functionality as needed.
- Improved performance: Detectron2 includes various performance optimizations that make it faster and more efficient than its predecessor.
- Native support for PyTorch: Being built on top of PyTorch, Detectron2 leverages the benefits of this popular deep learning framework, such as dynamic computation graphs and seamless GPU support.
- Pretrained models: Detectron2 provides a collection of pre-trained models that can be easily fine-tuned or used as-is for various computer vision tasks, making it easy to get started on a new project.
- Active community and support: The library has an active community of users and contributors who regularly update the codebase with new features, bug fixes, and improvements.
Detectron2 is a powerful tool for computer vision researchers and practitioners looking to implement, experiment with, and refine state-of-the-art models for object detection, instance segmentation, and pose estimation tasks.
Mask2Former

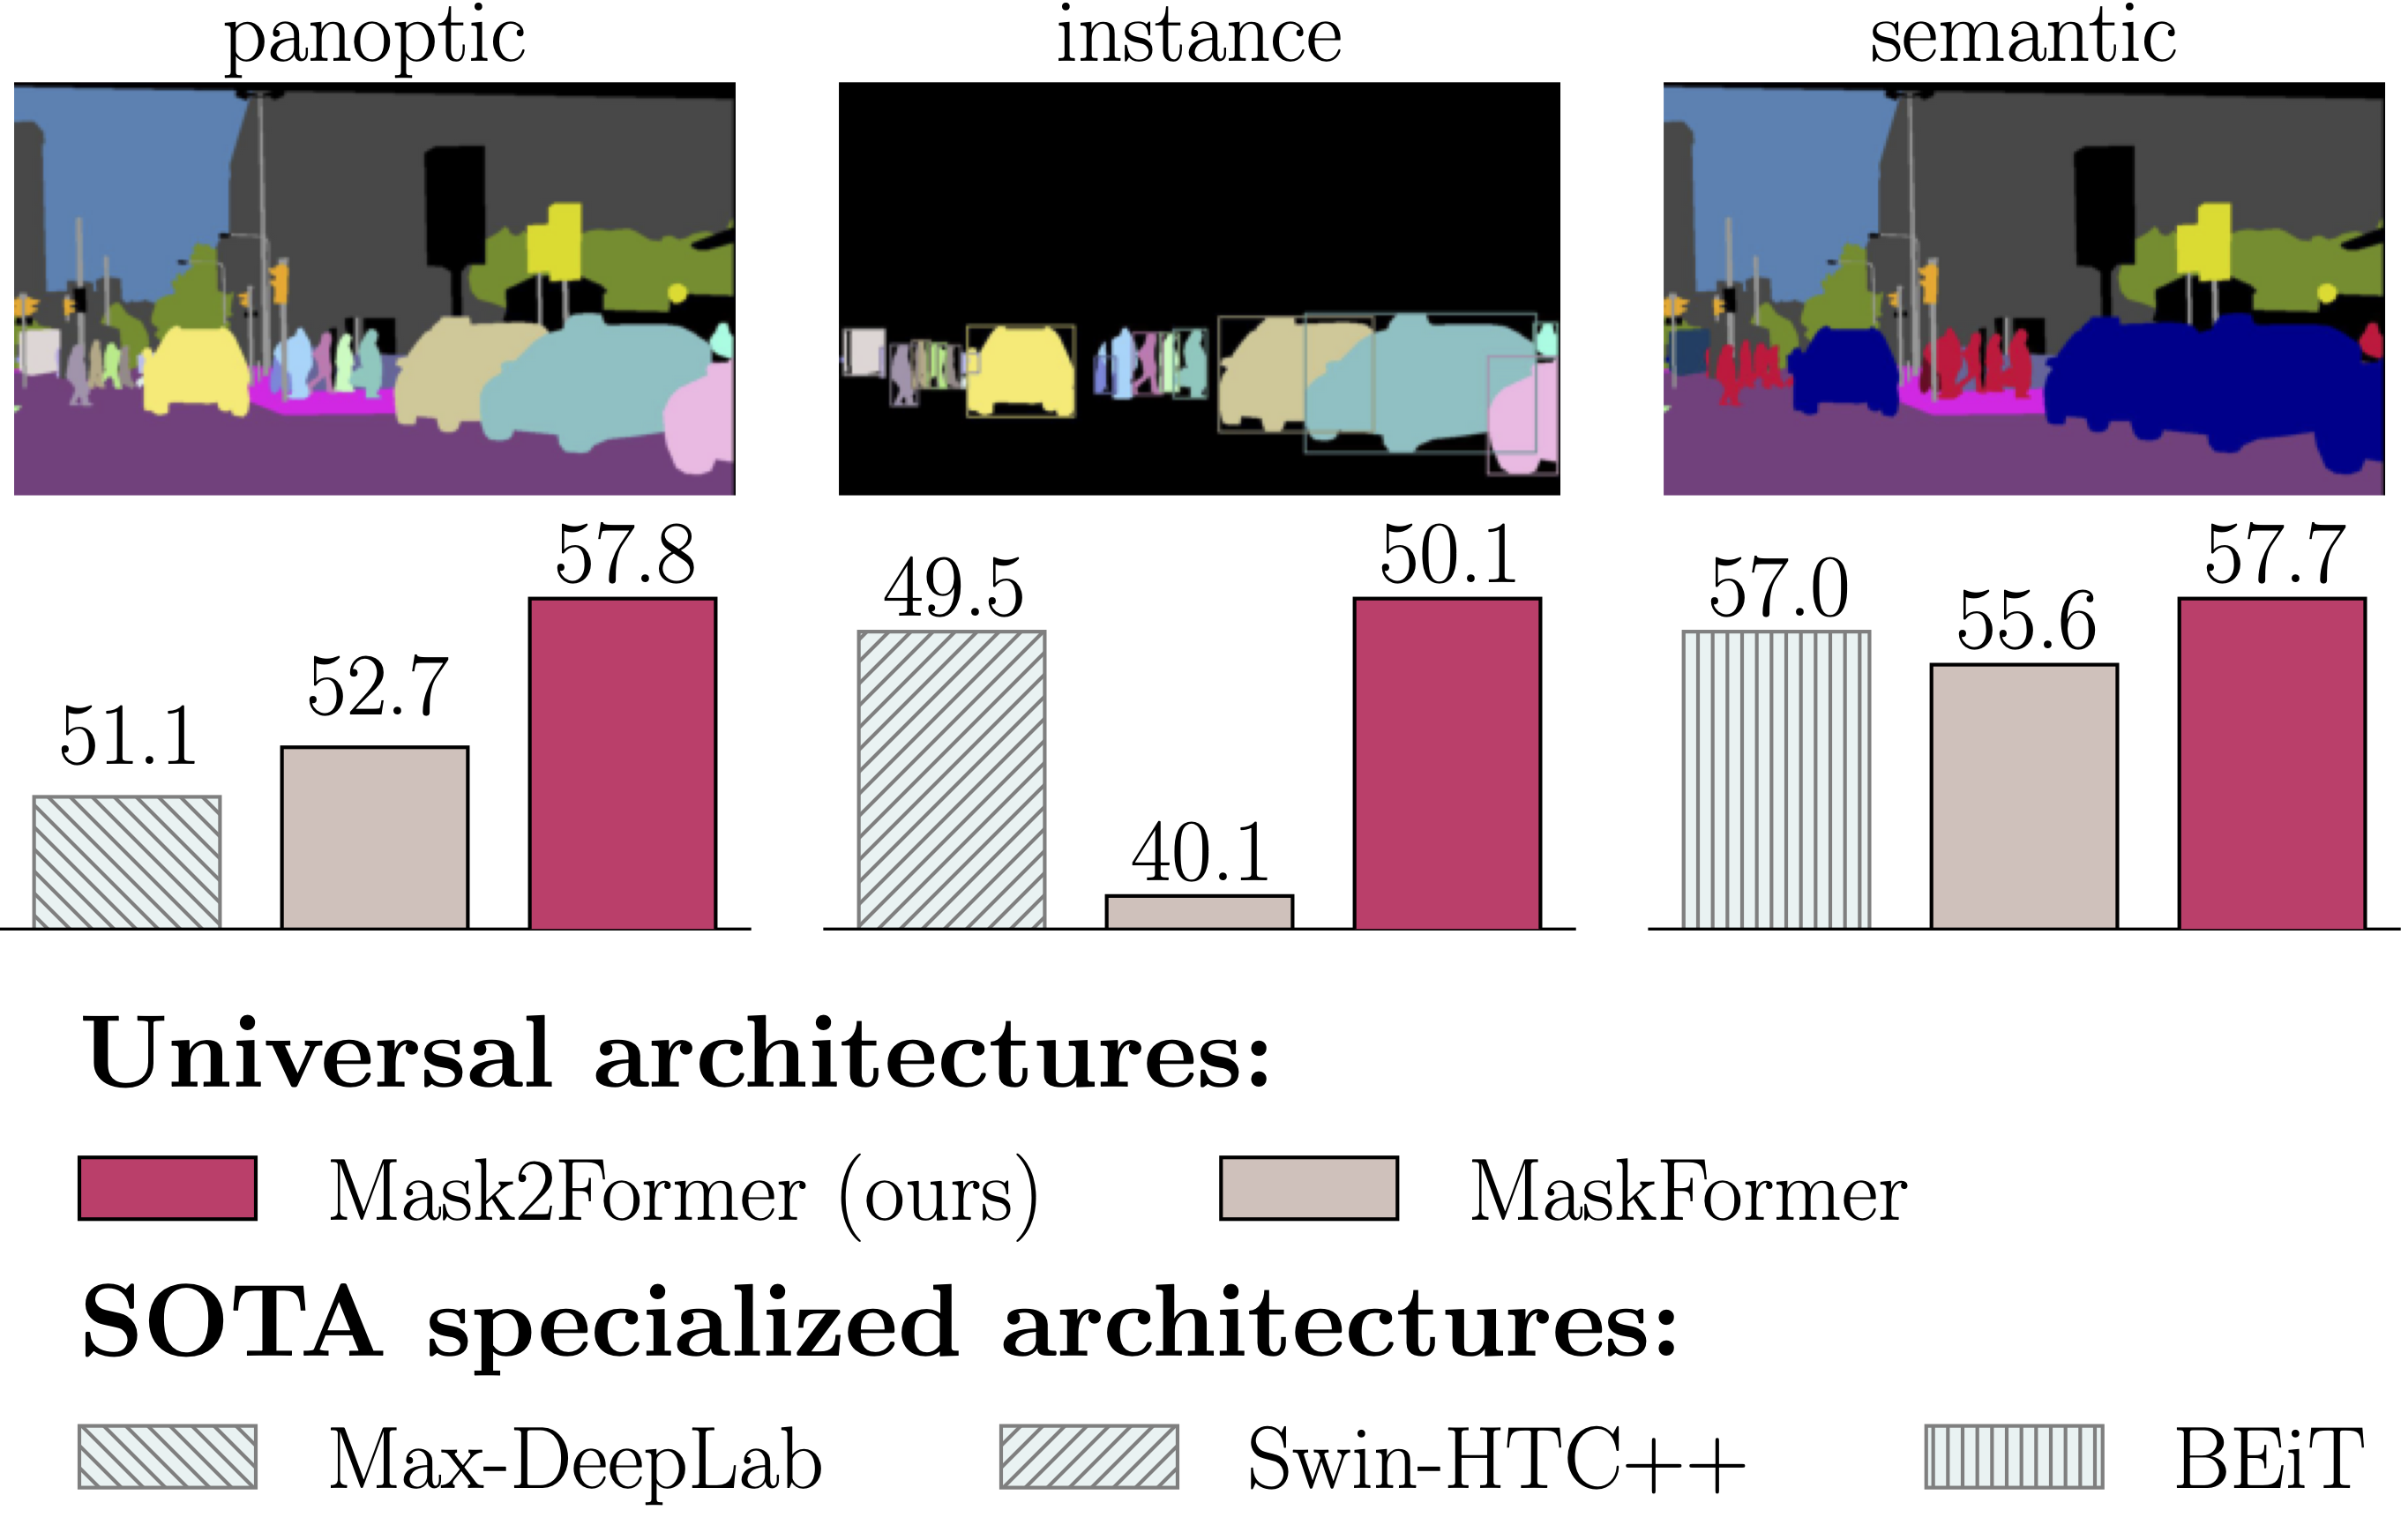
Mask2Former is a unified framework for panoptic, instance, and semantic segmentation proposed in the paper “Masked-attention Mask Transformer for Universal Image Segmentation” by Bowen Cheng, Ishan Misra, Alexander G. Schwing, Alexander Kirillov, and Rohit Girdhar. This model offers significant performance and efficiency improvements over the previous MaskFormer architecture.
The main idea behind Mask2Former is to use a single architecture capable of addressing various image segmentation tasks, including panoptic, instance, and semantic segmentation. The key components of Mask2Former include masked attention, which extracts localized features by constraining cross-attention within predicted mask regions.
By unifying the architecture for multiple segmentation tasks, Mask2Former not only reduces research effort but also outperforms specialized architectures for each task. It has set new state-of-the-art results for panoptic segmentation (57.8 PQ on COCO), instance segmentation (50.1 AP on COCO), and semantic segmentation (57.7 mIoU on ADE20K).
Mask2Former utilizes the same preprocessing and postprocessing steps as MaskFormer. You can use Mask2FormerImageProcessor or AutoImageProcessor to prepare images and optional targets for the model. To obtain the final segmentation, you can call post_process_semantic_segmentation(), post_process_instance_segmentation(), or post_process_panoptic_segmentation() depending on the task. All three tasks can be solved using Mask2FormerForUniversalSegmentation output, and panoptic segmentation accepts an optional label_ids_to_fuse argument to fuse instances of the target object/s (e.g., sky) together.
Prerequisites
Before diving into the tutorial, it’s essential to ensure that you have the necessary tools and resources in place. This tutorial has the following prerequisites:
- Docker: Docker is a platform that allows you to easily create, deploy, and run applications in containers. In this tutorial, we’ll be using Docker to manage the dependencies and streamline the setup process. If you’re new to Docker or need to install it, please visit the official Docker website for more information and installation instructions.
- CUDA Compatible GPU with at least 8GB of memory: Since we’ll be working with state-of-the-art image segmentation models, a CUDA-compatible GPU with at least 8GB of memory is necessary for optimal performance. These models can be computationally intensive, and having a powerful GPU will significantly reduce the processing time.
For those who don’t have access to a GPU, don’t worry! I’ll be releasing a follow-up article that demonstrates how to accomplish the same tasks using Google Colab, a cloud-based platform that provides free access to GPUs for machine learning and deep learning projects.
To simplify the setup process and ensure a smooth experience, I’ve published a Docker image that contains all the necessary prerequisites. This image can be downloaded from Docker Hub at the following link: https://hub.docker.com/r/thegeeksdiary/mask2former-jupyter-gpu. This Docker image will save you time and effort, allowing you to focus on the tutorial and quickly get started with object extraction using image segmentation.
With these prerequisites in place, you’ll be well-prepared to dive into the fascinating world of object extraction using Detectron2 and Mask2Former. So let’s jump right in.
Setting Up and Running the Docker Container
In this section, we’ll walk you through the process of cloning the GitHub repository, which contains the necessary files to start a Docker container using Docker Compose. The Docker container is based on the thegeeksdiary/mask2former-jupyter-gpu:latest image, and it sets up an environment to run the Mask2Former model with GPU support.
Follow these steps to clone the repository and start the Docker container:
1. Clone the GitHub repository: Open a terminal and run the following command to clone the repository to your local machine:
git clone https://github.com/the-geeks-diary/machine-learning-guides.git
2. Navigate to the example directory: Change your working directory to the folder containing the Docker Compose file:
cd machine-learning-guides/environment/mask2former-jupyter-gpu/example
3. (Optional) Configure volumes: The provided docker-compose.yml file maps two directories from your local machine to the Docker container: ./notebooks and ./data. If you want to use different directories on your local machine, update the paths accordingly.
volumes:
  - /path/to/your/notebooks:/environment/notebooks
  - /path/to/your/data:/environment/data
4. Start the Docker container: Run the following command in the terminal to start the Docker container using Docker Compose:
docker-compose up -d
The -d flag runs the container in detached mode, allowing it to run in the background.
4. Access Jupyter Notebook: Once the Docker container is running, you can access the Jupyter Notebook server by opening a web browser and navigating to http://localhost:8889.
Now you have successfully started the Docker container and accessed the Jupyter Notebook server. You can proceed with using the Mask2Former model for object extraction using image segmentation. You should see like the jupyter UI as shown below. Please click on the test-env.ipynb notebook (green in below screenshot)

Code Example Notebook
Once you click on the the notebook you should see a new tab with a notebook containing all the code explained in this article.

Importing Libraries
import warnings
warnings.filterwarnings('ignore')
import os
import sys
module_path = os.path.abspath(os.path.join('Mask2Former'))
if module_path not in sys.path:
    sys.path.append(module_path)
import locale
locale.getpreferredencoding = lambda: "UTF-8"
import polars as pl
import sklearn as sklearn
import scipy as scipy
import pandas as pd
import matplotlib
import matplotlib.pyplot as plt
import sys
import torch as pytorch
import cv2 as opencv
print(f"Polars Version: {pl.__version__}")
print(f"scikit-learn Version: {sklearn.__version__}")
print(f"scipy Version: {scipy.__version__}")
print(f"pandas Version: {pd.__version__}")
print(f"matplotlib Version: {matplotlib.__version__}")
print(f"PyTorch Version: {pytorch.__version__}")
print(f"OpenCV Version: {opencv.__version__}")
gpu = pytorch.cuda.is_available()
print("GPU is", "available" if gpu else "NOT AVAILABLE")
This Python code is essentially setting up the environment, importing necessary libraries, and checking the versions of those libraries, along with checking for GPU availability. Here’s a breakdown of the code:
1. Ignoring warnings: The first two lines import the warnings module and filter out any warnings to prevent them from being displayed in the output.
import warnings
warnings.filterwarnings('ignore')
2. Adding Mask2Former to the module path: The next few lines add the Mask2Former directory to the system path so that it can be imported as a module.
import os
import sys
module_path = os.path.abspath(os.path.join('Mask2Former'))
if module_path not in sys.path:
    sys.path.append(module_path)
3. Importing necessary libraries: The following libraries are imported for data manipulation, machine learning, and visualization:
import polars as pl
import sklearn as sklearn
import scipy as scipy
import pandas as pd
import matplotlib
import matplotlib.pyplot as plt
import torch as pytorch
import cv2 as opencv
4. Printing library versions: The next few lines print the version numbers of the imported libraries to ensure compatibility and proper functioning.
print(f"Polars Version: {pl.__version__}")
print(f"scikit-learn Version: {sklearn.__version__}")
print(f"scipy Version: {scipy.__version__}")
print(f"pandas Version: {pd.__version__}")
print(f"matplotlib Version: {matplotlib.__version__}")
print(f"PyTorch Version: {pytorch.__version__}")
print(f"OpenCV Version: {opencv.__version__}")
5. Checking GPU availability: The last two lines check if a GPU is available for PyTorch and print the result.
gpu = pytorch.cuda.is_available()
print("GPU is", "available" if gpu else "NOT AVAILABLE")
In summary, this code sets up the environment, imports necessary libraries, checks their versions, and verifies if a GPU is available for PyTorch.
Setup Detectron & Mask2Former
import detectron2
from detectron2.utils.logger import setup_logger
setup_logger()
setup_logger(name="mask2former")
import numpy as np
import cv2
import torch
from detectron2 import model_zoo
from detectron2.engine import DefaultPredictor
from detectron2.config import get_cfg
from detectron2.utils.visualizer import Visualizer, ColorMode
from detectron2.data import MetadataCatalog
from detectron2.projects.deeplab import add_deeplab_config
coco_metadata = MetadataCatalog.get("coco_2017_val_panoptic")
from mask2former import add_maskformer2_config
This code snippet imports necessary libraries and sets up Detectron2 and Mask2Former for image segmentation tasks. Here’s a step-by-step explanation:
1. Import Detectron2: The first line imports the detectron2 library.
import detectron2
2. Set up logger: The next few lines import the setup_logger function from detectron2.utils.logger and set up loggers for both Detectron2 and Mask2Former. Loggers help you keep track of important events and messages during the execution of your code.
from detectron2.utils.logger import setup_logger
setup_logger()
setup_logger(name="mask2former")
3. Import essential libraries: The following lines import numpy, cv2 (OpenCV), and torch (PyTorch) libraries for array manipulation, image processing, and deep learning, respectively.
import numpy as np
import cv2
import torch
4. Import Detectron2 components: This part imports various components from Detectron2, such as the model_zoo (a collection of pre-trained models), DefaultPredictor (for making predictions using the models), get_cfg (for loading configuration files), Visualizer and ColorMode (for visualizing the results), and MetadataCatalog (for accessing dataset metadata).
from detectron2 import model_zoo
from detectron2.engine import DefaultPredictor
from detectron2.config import get_cfg
from detectron2.utils.visualizer import Visualizer, ColorMode
from detectron2.data import MetadataCatalog
5. Import DeepLab configuration: This line imports the add_deeplab_config function from detectron2.projects.deeplab to add DeepLab-specific configuration options.
from detectron2.projects.deeplab import add_deeplab_config
6. Get COCO metadata: This line retrieves the metadata for the “coco_2017_val_panoptic” dataset using the MetadataCatalog and stores it in the coco_metadata variable.
coco_metadata = MetadataCatalog.get("coco_2017_val_panoptic")
7. Import Mask2Former configuration: The last line imports the add_maskformer2_config function from the mask2former module.
from mask2former import add_maskformer2_config
In summary, this code snippet imports necessary libraries, sets up loggers for Detectron2 and Mask2Former, and imports various components and configurations required for image segmentation tasks using Detectron2 and Mask2Former.
Loading Example Image
im = cv2.imread("data/smartphone_1.jpg")
plt.figure(figsize = (20,20))
plt.imshow(im[:, :, ::-1])
plt.show()
This Python code snippet reads and displays an input image to be used in the article’s image segmentation tutorial.
1. Read the image: The cv2.imread() function from the OpenCV library reads the input image file “smartphone_1.jpg” from the “data” folder and stores it in the im variable. It reads the image in the BGR format, which is the default color format for OpenCV.
im = cv2.imread("data/smartphone_1.jpg")
2. Create a figure: The plt.figure() function from the Matplotlib library is used to create a new figure with a specified size (20×20 inches in this case).
plt.figure(figsize=(20, 20))
3. Convert BGR to RGB and Display the Image: The first line of code snippet below converts the color format of the image from BGR (used by OpenCV) to RGB (used by Matplotlib for display) by reversing the order of the color channels using im[:, :, ::-1] and pass it to matplotlib. In the second line of this code plt.show() function is called to display the image in the created figure.
plt.imshow(im[:, :, ::-1])
plt.show()
This code snippet is used to display the input image that will be processed using the image segmentation techniques discussed in the tutorial.

Configuring and Initializing the Model
cfg = get_cfg()
add_deeplab_config(cfg)
add_maskformer2_config(cfg)
cfg.merge_from_file("Mask2Former/configs/coco/panoptic-segmentation/swin/maskformer2_swin_large_IN21k_384_bs16_100ep.yaml")
cfg.MODEL.WEIGHTS = 'https://dl.fbaipublicfiles.com/maskformer/mask2former/coco/panoptic/maskformer2_swin_large_IN21k_384_bs16_100ep/model_final_f07440.pkl'
cfg.MODEL.MASK_FORMER.TEST.SEMANTIC_ON = False
cfg.MODEL.MASK_FORMER.TEST.INSTANCE_ON = True
cfg.MODEL.MASK_FORMER.TEST.PANOPTIC_ON = True
cfg.MODEL.ROI_HEADS.SCORE_THRESH_TEST = 0.7
predictor = DefaultPredictor(cfg)
1. Get the base configuration: The get_cfg() function is called to get a base configuration object from Detectron2, which is stored in the cfg variable.
cfg = get_cfg()
2. Add DeepLab and Mask2Former configurations: The add_deeplab_config() and add_maskformer2_config() functions are called to add DeepLab-specific and Mask2Former-specific configuration options to the base configuration object.
add_deeplab_config(cfg)
add_maskformer2_config(cfg)
3. Merge configuration from file: The cfg.merge_from_file() function is called to merge the configuration from the specified Mask2Former configuration file with the current configuration object.
cfg.merge_from_file("Mask2Former/configs/coco/panoptic-segmentation/swin/maskformer2_swin_large_IN21k_384_bs16_100ep.yaml")
4. Set model weights: The cfg.MODEL.WEIGHTS attribute is set to the URL of the pre-trained Mask2Former model weights.
cfg.MODEL.WEIGHTS = 'https://dl.fbaipublicfiles.com/maskformer/mask2former/coco/panoptic/maskformer2_swin_large_IN21k_384_bs16_100ep/model_final_f07440.pkl'
5. Configure model test settings: The next three lines set the semantic, instance, and panoptic segmentation settings for the Mask2Former model during testing. In this case, only instance and panoptic segmentation are enabled.
cfg.MODEL.MASK_FORMER.TEST.SEMANTIC_ON = False
cfg.MODEL.MASK_FORMER.TEST.INSTANCE_ON = True
cfg.MODEL.MASK_FORMER.TEST.PANOPTIC_ON = True
6. Set score threshold: The cfg.MODEL.ROI_HEADS.SCORE_THRESH_TEST attribute is set to 0.7, which is the threshold for instance detection scores. Instances with scores below this threshold will be discarded.
cfg.MODEL.ROI_HEADS.SCORE_THRESH_TEST = 0.7
7. Initialize the predictor: The DefaultPredictor class from Detectron2 is instantiated with the configuration object, creating a predictor object that will be used to make predictions using the Mask2Former model.
predictor = DefaultPredictor(cfg)
These code snippet prepares the Mask2Former model with the appropriate configuration settings for object extraction using panoptic and instance segmentation techniques.
Generating and Visualizing Instance Segmentation Results
outputs = predictor(im)
v = Visualizer(im[:, :, ::-1], coco_metadata, scale=1.2, instance_mode=ColorMode.IMAGE_BW)
instance_result = v.draw_instance_predictions(outputs["instances"].to("cpu")).get_image()
plt.figure(figsize = (20,20))
plt.imshow(instance_result[:, :, ::-1])
plt.show()
This Python code snippet uses the previously configured predictor object to generate instance segmentation results for the input image and visualizes the results using Matplotlib.
1. Generate predictions: The predictor() function is called with the input image im to generate instance segmentation predictions. The results are stored in the outputs variable.
outputs = predictor(im)
2. Initialize Visualizer & Draw Predictions: A Visualizer object is initialized with the input image (converted from BGR to RGB), the COCO metadata (coco_metadata), the desired scale for visualization (1.2), and the color mode set to ColorMode.IMAGE_BW (black and white). The draw_instance_predictions() method of the Visualizer object is called with the instance predictions (outputs["instances"].to("cpu")), and the resulting image with drawn instances is obtained using the get_image() method.
v = Visualizer(im[:, :, ::-1], coco_metadata, scale=1.2, instance_mode=ColorMode.IMAGE_BW)
instance_result = v.draw_instance_predictions(outputs["instances"].to("cpu")).get_image()
Display the result: The plt.figure() function from the Matplotlib library is used to create a new figure with a specified size (20×20 inches in this case). The plt.imshow() function is called to display the instance segmentation result (instance_result) in the created figure. The image color channels are converted from BGR to RGB using instance_result[:, :, ::-1]. The plt.show() function is called to display the figure containing the instance segmentation result.
plt.figure(figsize = (20,20))
plt.imshow(instance_result[:, :, ::-1])
plt.show()
Thes code snippet generates instance segmentation predictions for the input image using the Mask2Former model and visualizes the results.

Creating a Transparent Image with the Extracted Object
img_height, img_width = im.shape[0], im.shape[1]
masks = outputs["instances"].pred_masks.to("cpu")
pred_classes = outputs["instances"].pred_classes.to("cpu")
n_channels = 4
transparent_img = np.zeros((img_height, img_width, n_channels), dtype=np.uint8)
phone_label_index = np.argmax(outputs["instances"].scores.cpu().numpy())
if (pred_classes[phone_label_index]==67):
    for h in range(img_height):
        for w in range(img_width):
            #if(mask_1[h][w]==1):
            if(masks[phone_label_index][h][w]==1):
                transparent_img[h][w] = [im[h][w][0], im[h][w][1], im[h][w][2], 255]
plt.figure(figsize = (20,20))
plt.imshow(transparent_img)
plt.show()
This Python code snippet extracts the highest-scoring instance of a smartphone from the input image and creates a transparent PNG image with only the smartphone visible, using the instance segmentation results.
1. Get image dimensions: The height and width of the input image im are obtained and stored in img_height and img_width variables.
img_height, img_width = im.shape[0], im.shape[1]
2. Extract masks and predicted classes: The instance segmentation masks and predicted classes are extracted from the outputs variable and stored in the masks and pred_classes variables.
masks = outputs["instances"].pred_masks.to("cpu")
pred_classes = outputs["instances"].pred_classes.to("cpu")
3. Initialize transparent image: A transparent image is initialized with the same dimensions as the input image, and 4 channels (RGBA) with values set to zeros (i.e., fully transparent).
n_channels = 4
transparent_img = np.zeros((img_height, img_width, n_channels), dtype=np.uint8)
4. Find the highest-scoring smartphone instance: The index of the highest-scoring smartphone instance is obtained using np.argmax() and stored in the phone_label_index variable. The value 67 corresponds to the ‘cell phone’ class in the COCO dataset.
phone_label_index = np.argmax(outputs["instances"].scores.cpu().numpy())
if (pred_classes[phone_label_index]==67):
5. Transfer smartphone pixels to the transparent image: The nested loops iterate through each pixel in the input image. If the highest-scoring smartphone instance’s mask value at the current pixel is 1 (i.e., part of the smartphone), the pixel values from the input image, along with an alpha value of 255 (fully opaque), are assigned to the corresponding pixel in the transparent image.
    for h in range(img_height):
        for w in range(img_width):
            if(masks[phone_label_index][h][w]==1):
                transparent_img[h][w] = [im[h][w][0], im[h][w][1], im[h][w][2], 255]
6. Display the transparent image: The plt.figure() function is called to create a new figure with a specified size (20×20 inches in this case), and the plt.imshow() function is called to display the transparent image containing the extracted smartphone. Finally, the plt.show() function is called to display the figure.
plt.figure(figsize = (20,20))
plt.imshow(transparent_img)
plt.show()

These code snippet demonstrates how to use the instance segmentation results to extract a specific object (the smartphone) from the input image and create a transparent PNG image with only the smartphone visible.
Conclusion
In this tutorial, we learnt how to extract objects from images using Detectron2 and Mask2Former for instance segmentation. The article provides a step-by-step guide to set up the required environment, including Docker and CUDA-compatible GPU, as well as utilizing a pre-built Docker image with all necessary dependencies. For those without a GPU, I plan on writing a follow-up article using Google Colab.
The tutorial covers various code snippets, explaining how to import necessary libraries, configure and use the Mask2Former model, and generate instance segmentation results for a given input image. We also learnt how to visualize the segmentation results using Matplotlib and how to create a transparent PNG image containing only the extracted object with a transparent background.
I hope that the readers will be able to use Detectron2 and Mask2Former to perform instance segmentation and extract objects from images effectively.


Leave a Reply