Your cart is currently empty!
How To: Setup Tensorflow With GPU Support using Docker

Previously I published a guide for setting up tensorflow in an anconda environment with GPU support. A lot of people liked it and I have been working with this environment myself for more than a year now. I am happy with the results however the process is a bit involved and requires quite a bit of configuration on the OS level as well as setting up the CUDA and cuDNN libraries on your windows machine. The problem with this kind of setup is that – your GPU drivers and the installed CUDA and cuDNN library versions affect the tensorflow environments and that are available to you. On windows there are frequent graphics driver updates from Nvidia which can break your environments. While running all of this in a conda environment gives you some relief in terms of isolating the dependencies but since the GPU drivers as well as CUDA and cuDNN libraries have to be installed on your host machine – the versions of these can go out of sync due to automatic windows updates. Also there are very strict requirements from tensorflow in terms of supported CUDA versions. So what can we do?

Docker Comes to Rescue
Docker is a great tool that helps us create virtualized environments which are isolated on the kernel level which means that you are not sharing the software configuration with the host machine. This article assumes that you have some familiarity with using docker, if you are new to docker, I will recommend you to quickly go through this getting started guide. Recently I came across this simple way of being able to pass through the GPUs inside a docker container. This means that your operating system will expose your native GPU as a shared device to the docker host such that the container will have access to the GPU and you don’t need to install CUDA or CUDNN libraries on your host machine.

In this article I will guide you through the step by step process of using one of the docker images that I have created which contains most of the popular machine learning libraries along with Jupyter notebooks to get upto speed instantly.
My Environment
One of the advantages of using docker is that your host machine environment doesn’t matter a lot in terms of what is available inside the containers but I am still listing it to give an idea around what machine I am using to provide this guide.
My environment is as follows.
- Operating System: Windows 11 Pro (everything in artical would work on Windows 11 editions)
- Processor: AMD Ryzen Threadripper 2970WX (CPU doesn’t matter)
- Motherboard: Asus Rog X399 (Any motherboard is fine)
- Graphics Card: NVIDIA GeForce RTX 2070 8GB GDRR6 (any RTX or Quadro GPU is fine)
Dependencies
To follow along this guide you will need to install the following on your host machine.
- GPU driver for your Nvidia Graphics Card, you can follow the instructions listed in Step 1: NVIDIA Graphics Driver Installation section in How To: Setup Tensorflow With GPU Support in Windows 11 article that I published earlier.
- Docker desktop: To install docker desktop on your OS – please follow the guide available at Get Docker documentation.
No additional software is needed after installing these 2 dependencies, this is the beauty of using a virtualization solution like containers. Did I just say that I ❤️Docker.

Configuring a Python Environment
Now we are ready to create a new environment and start building deep-learning models using tensorflow with full GPU support.
Step 1: Create a folder for code and docker-compose
We will use docker-compose to quickly spin up and destroy ephemeral environments for our machine learning projects. Please go ahead and create a new folder/directory on your machine and in the root of the folder create a new file called docker-compose.yml. This file will define the environment that we will be working with. Go ahead and paste the following code in the newly created docker-compose.yml file.
version: '3.0'
services:
  tensorflow:
    container_name: tensorflow-gpu
    image: thegeeksdiary/tensorflow-jupyter-gpu:latest
    restart: unless-stopped
    volumes:
      - ./notebooks:/environment/notebooks
      - ./data:/environment/data
    deploy:
      resources:
        reservations:
          devices:
          - driver: nvidia
            device_ids: ['0']
            capabilities: [gpu]
    ports:
      - '8888:8888'
    networks:
      - jupyter
networks:
  jupyter:
    driver: bridge
Step 2: Create Directories For Notebooks & Data
Now let’s go ahead and create 2 directories in the root of the code folder/directory that we created in the previous step. Please name them notebooks and data (check the code at line# 8 & line# 9 in previous section in the docker-compose.yml file). This would allow you to the persist the code and also provide data (like csv/json files) that you would write in the Jupyter notebooks running inside the docker container that we will spin up in the next step. Basically this is just a way to pass data files from your host machine to the Jupyter notebooks running inside the container and save the notebooks that you will create to your host machine so that you can for example check them into your version control system like git.
Step 3: Open The Jupyter Notebook & Start Modeling
In the root of your repo/code folder type type the below command:
docker-compose up
This can take a while depending on your machine and network bandwidth as the image is approximately 9 GB in size, you might need to increase the allocated storage for the docker desktop on your machine – I am using the WSL backend for docker which means that that I am not affected by the image size but if you are still using Hyper-V as the virtualization backend then this article might help you. Once the container is running you should see something like this in your terminal.
/usr/local/lib/python3.8/dist-packages/traitlets/traitlets.py:2544: FutureWarning: Supporting extra quotes around strings is deprecated in traitlets 5.0. You can use '' instead of "''" if you require traitlets >=5.                                                                                                                                                                      warn(
[I 16:50:53.312 NotebookApp] Writing notebook server cookie secret to /root/.local/share/jupyter/runtime/notebook_cookie_secret
[I 16:50:53.313 NotebookApp] Authentication of /metrics is OFF, since other authentication is disabled.
[W 16:50:53.718 NotebookApp] All authentication is disabled.  Anyone who can connect to this server will be able to run code.
[I 16:50:54.492 NotebookApp] jupyter_tensorboard extension loaded.
[I 16:50:54.537 NotebookApp] JupyterLab extension loaded from /usr/local/lib/python3.8/dist-packages/jupyterlab
[I 16:50:54.537 NotebookApp] JupyterLab application directory is /usr/local/share/jupyter/lab
[I 16:50:54.539 NotebookApp] [Jupytext Server Extension] NotebookApp.contents_manager_class is (a subclass of) jupytext.TextFileContentsManager already - OK
[I 16:50:54.540 NotebookApp] Serving notebooks from local directory: /environment
[I 16:50:54.540 NotebookApp] Jupyter Notebook 6.4.10 is running at:
[I 16:50:54.540 NotebookApp] http://hostname:8888/
[I 16:50:54.540 NotebookApp] Use Control-C to stop this server and shut down all kernels (twice to skip confirmation).
Once the container is running – you can open a browser on your machine and navigate to http://localhost:8888/tree URL. You should now be presented with a UI similar to the below image.

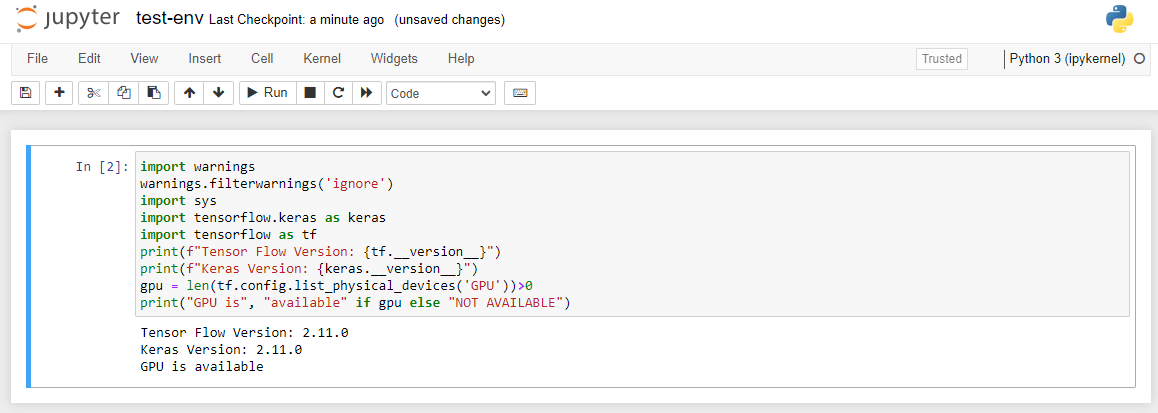
You can now open the included notebook test-env.ipynb and run the first and only cell to verify that tensorflow and the GPU is indeed available in your new environment. You should see output as shown below upon running the first cell.
Conclusion
I am maintaining the docker images provided above and I use them for my personal machine learning development workflows as well, I hope you found this article helpful, if you run into any issues or have ideas to improve certain aspects – please drop a comment below – I am sure it will help. Also please check out my other articles to see other useful tutorials.
I have published a series on deep learning using tensorflow, checkout that article here.
https://thegeeksdiary.com/2023/03/23/introduction-to-deep-learning-with-tensorflow-deep-learning-1/
23 responses to “How To: Setup Tensorflow With GPU Support using Docker”
-
[…] robust then configuring the entire drivers and CUDA libraries on your local machine. Checkout the article at the below […]
-
awesome that was super easy to follow, sadly i run into an error docker is running and i can run the test file, but it shows this error “2023-02-22 21:16:39.917701: I tensorflow/core/platform/cpu_feature_guard.cc:193] This TensorFlow binary is optimized with oneAPI Deep Neural Network Library (oneDNN) to use the following CPU instructions in performance-critical operations: AVX2 FMA
To enable them in other operations, rebuild TensorFlow with the appropriate compiler flags.
2023-02-22 21:16:40.731366: W tensorflow/compiler/xla/stream_executor/platform/default/dso_loader.cc:64] Could not load dynamic library ‘libnvinfer.so.7’; dlerror: libnvinfer.so.7: cannot open shared object file: No such file or directory; LD_LIBRARY_PATH: /usr/local/cuda/extras/CUPTI/lib64:/usr/local/cuda/compat/lib:/usr/local/nvidia/lib:/usr/local/nvidia/lib64
2023-02-22 21:16:40.731498: W tensorflow/compiler/xla/stream_executor/platform/default/dso_loader.cc:64] Could not load dynamic library ‘libnvinfer_plugin.so.7’; dlerror: libnvinfer_plugin.so.7: cannot open shared object file: No such file or directory; LD_LIBRARY_PATH: /usr/local/cuda/extras/CUPTI/lib64:/usr/local/cuda/compat/lib:/usr/local/nvidia/lib:/usr/local/nvidia/lib64
2023-02-22 21:16:40.731505: W tensorflow/compiler/tf2tensorrt/utils/py_utils.cc:38] TF-TRT Warning: Cannot dlopen some TensorRT libraries. If you would like to use Nvidia GPU with TensorRT, please make sure the missing libraries mentioned above are installed properly.” i´m running a windows 10 (latest 22H) and a 3090 with the latest drivers aviable THANKS Daniel-
Hey Daniel,
Glad that you found it easy to follow. The above logs are for warnings related to tensorRT libraries which are used to parallelize inference between multiple GPUs and between cores on a single GPU for model architecture that support so. For most use cases you build sequential models using tensorflow so you don’t need to worry about these warnings.
As I said these are just warnings and you can train models on your GPU just fine. Please let me what are you planning on building, I think it would be cool to see it in action.-
Thanks okay, was not sure if it will work but it was late yesterday so i oversaw that this are just warnings. Im absolute new to it but spend the last week finding a way to make it work, tensorflow on cpu with python was pretty easy and my first test with a quick Lotto number genereting based on historic Data did work pretty well, but then my troubles beginn because I recognized it only work on cpu and then boom spent as i said the last week to get it running but every guide so far did end in an error or not clear or debending on old packages, my plan is to train a geometric image recognizing model should be easy but as I said just starting in this new world.
-
Great stuff mate, please post your code repository link here for the community to see, it would help others to get started on similar kind of learning projects.
-
-
When installing any libraries using pip in Jupyter notebook new connection error occurs.
-
Hi Nikhil,
Can you please post the error here as to what error you are getting.
Cheers,
Pradeep
Hi,
I have enjoyed your tutorials. I was able to follow the Docker and got it running on my Windows 11 PC. I wanted to ask you a question. Instead of using Jupyter Notebooks, how can I use the Docker TensorFlow Image as a template to develop and run models in Visual Studio Code?
-
Hey Johnny,
Glad that you liked the tutorial – there are a few ways to do so – I will try to publish an article this week. Please subscribe to get a notification once I do so.
Happy coding!
How would you create a Default Container, just like the tensorflow-gpu that you shared above to develop new tensor-based application that use a docker container and that can be edited in Visual Studio Code, just like the jupyter notebook?
-
Johnny,
I will publish a guide shortly about it.
Hi Pradeep,
I have built the Docker image with TensorFlow, and it is running fine. I noticed that in your conclusion, you are continuing to use this image for your development. I would like to follow the same approach and use VS Code to develop ML apps. can you recommend an approach? I have read the Microsoft Docker VS Code tutorials and s well as the TensorFlow tutorials with docker; none of them touched on this topic.
Thanks for the docker-compose.yml file, finally managed to set this up in Ubuntu 20! Cheers 🙂
-
Thanks mate – glad that you found this useful.
A great job, thanks a lot to simplified the task to run GPU in docker
hey , installation looks super easy and clean and it went well for me , but the kerner is dying for some reason. I’m sorry i didn’t provide any log . I don’t know how to share .please help
-
Eliot – you can get the logs from the running/stopped docker container using the Docker Desktop UI or commandline.
Here are the guides to do so:
1. https://docs.docker.com/engine/reference/commandline/logs/
2. https://www.baeldung.com/ops/docker-logsUnfortunately without logs I am unable to suggest any solution.
Thanks so much for this tutorial. I saved a lot of time and problems.
The program is stuck for many hours in this part, is this normal?
[+] Running 2/2
– Network dockertf_jupyter Created 0.1s
– Container tensorflow-gpu Created 1.1s
Attaching to tensorflow-gpu
-
Juliana,
Yes the docker container is running and now you can access the jupyter notebook interface in your browser by visiting the link http://localhost:8888.
[…] am publishing this article in response to a comment I received on How To: Setup Tensorflow With GPU Support using Docker article. Docker is all good […]
Hello,
I suspect I have failed somehow on my end with setting up my gpu drivers. I will look further into your other articles to see if there is something I can do about it. The code ran great however when I ran the test environment I ran into these errors. It certainly doesn’t appear that the gpu is working.
2023-08-15 01:19:14.345248: I tensorflow/core/util/port.cc:110] oneDNN custom operations are on. You may see slightly different numerical results due to floating-point round-off errors from different computation orders. To turn them off, set the environment variable `TF_ENABLE_ONEDNN_OPTS=0`.
2023-08-15 01:19:14.541665: I tensorflow/core/platform/cpu_feature_guard.cc:182] This TensorFlow binary is optimized to use available CPU instructions in performance-critical operations.
To enable the following instructions: AVX2 AVX_VNNI FMA, in other operations, rebuild TensorFlow with the appropriate compiler flags.
Polars Version: 0.18.6
scikit-learn Version: 1.3.0
scipy Version: 1.10.1
pandas Version: 2.0.3
matplotlib Version: 3.7.2
Tensor Flow Version: 2.13.0
—————————————————————————
AttributeError Traceback (most recent call last)
Cell In[1], line 21
19 print(f”matplotlib Version: {matplotlib.__version__}”)
20 print(f”Tensor Flow Version: {tf.__version__}”)
—> 21 print(f”Keras Version: {keras.__version__}”)
22 print(f”OpenCV Version: {opencv.__version__}”)
23 gpu = len(tf.config.list_physical_devices(‘GPU’))>0
AttributeError: module ‘tensorflow.keras’ has no attribute ‘__version__’
-
Paul,
I suspect that your tensorflow is corrupted inside the container. Dont’ worry – it happens when we are trying to get things running and experiment with different things.
I suggest that you drop the docker container and create a new container again. If you are following the article exactly then the following commands might helpdocker-compose down
This command needs to be run in the director where you have the docker-compose file docker-compose.yml
Doing a docker-compose up again will recreate a fresh container with correct tensorflow pre-installed.
Hope this helps


Leave a Reply to LRPCancel reply